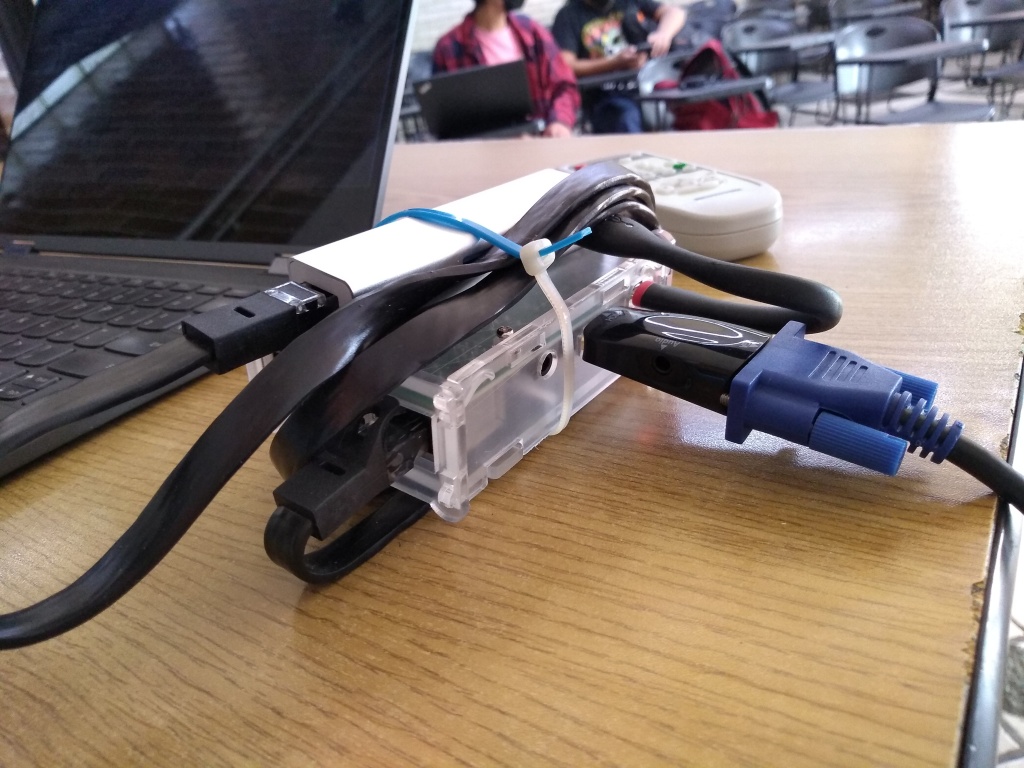
Using a RPi as a display adapter
Almost ten months ago, I mentioned on this blog I bought an ARM laptop, which is now my main machine while away from home — a Lenovo Yoga C630 13Q50. Yes, yes, I am still not as much away from home as I used to before, as this pandemic is still somewhat of a thing, but I do move more.
My main activity in the outside world with my laptop is teaching. I teach twice a week, and… well, having a display for my slides and for showing examples in the terminal and such is a must. However, as I said back in August, one of the hardware support issues for this machine is:
No HDMI support via the USB-C displayport. While I don’t expect
to go to conferences or even classes in the next several months,
I hope this can be fixed before I do. It’s a potential important
issue for me.
It has sadly… not yet been solved ☹ While many things have improved since kernel 5.12 (the first I used), the Device Tree does not yet hint at where external video might sit.
So, I went to the obvious: Many people carry different kinds of video adaptors… I carry a slightly bulky one: A RPi3 😐
For two months already (time flies!), I had an ugly contraption where the RPi3 connected via Ethernet and displayed a VNC client, and my laptop had a VNC server. Oh, but did I mention — My laptop works so much better with Wayland than with Xorg that I switched, and am now a happy user of the Sway compositor (a drop-in replacement for the i3 window manager). It is built over WLRoots, which is a great and (relatively) simple project, but will thankfully not carry some of Gnome or KDE’s ideas — not even those I’d rather have. So it took a bit of searching; I was very happy to find WayVNC, a VNC server for wlroot-sbased Wayland compositors. I launched a second Wayland, to be able to have my main session undisturbed and present only a window from it.
Only that… VNC is slow and laggy, and sometimes awkward. So I kept searching for something better. And something better is, happily, what I was finally able to do!
In the laptop, I am using wf-recorder to grab an area of the screen and funnel it into a V4L2 loopback device (which allows it to be used as a camera, solving the main issue with grabbing parts of a Wayland screen):
/usr/bin/wf-recorder -g '0,32 960x540' -t --muxer=v4l2 --codec=rawvideo --pixelformat=yuv420p --file=/dev/video10
(yes, my V4L2Loopback device is set to /dev/video10). You will note
I’m grabbing a 960×540 rectangle, which is the top ¼ of my screen
(1920x1080) minus the Waybar. I think I’ll increase it to 960×720, as
the projector to which I connect the Raspberry has a 4×3 output.
After this is sent to /dev/video10, I tell ffmpeg to send it via
RTP to
the fixed address of the Raspberry:
/usr/bin/ffmpeg -i /dev/video10 -an -f rtp -sdp_file /tmp/video.sdp rtp://10.0.0.100:7000/
Yes, some uglier things happen here. You will note /tmp/video.sdp
is created in the laptop itself; this file describes the stream’s
metadata so it can be used from the client side. I cheated and copied
it over to the Raspberry, doing an ugly hardcode along the way:
user@raspi:~ $ cat video.sdp
v=0
o=- 0 0 IN IP4 127.0.0.1
s=No Name
c=IN IP4 10.0.0.100
t=0 0
a=tool:libavformat 58.76.100
m=video 7000 RTP/AVP 96
b=AS:200
a=rtpmap:96 MP4V-ES/90000
a=fmtp:96 profile-level-id=1
People familiar with RTP will scold me: How come I’m streaming to the unicast client address? I should do it to an address in the 224.0.0.0–239.0.0.0 range. And it worked, sometimes. I switched over to 10.0.0.100 because it works, basically always ☺
Finally, upon bootup, I have configured
NoDM to start a session with
the user user, and dropped the following in my user’s .xsession:
setterm -blank 0 -powersave off -powerdown 0
xset s off
xset -dpms
xset s noblank

mplayer -msglevel all=1 -fs /home/usuario/video.sdp
Anyway, as a result, my students are able to much better follow the pace of my presentation, and I’m able to do some tricks better (particularly when it requires quick reaction times, as often happens when dealing with concurrency and such issues).
Oh, and of course — in case it’s of interest to anybody, knowing that SD cards are all but reliable in the long run, I wrote a vmdb2 recipe to build the images. You can grab it here; it requires some local files to be present to be built — some are the ones I copied over above, and the other ones are surely of no interest to you (such as my public ssh key or such :-] )
What am I still missing? (read: Can you help me with some ideas? 😉)
- I’d prefer having Ethernet-over-USB. I have the USB-C Ethernet adapter, which powers the RPi and provides a physical link, but I’m sure I could do away with the fugly cable wrapped around the machine…
- Of course, if that happens, I would switch to a much sexier Zero RPi. I have to check whether the video codec is light enough for a plain ol’ Zero (armel) or I have to use the much more powerful Zero 2… I prefer sticking to the lowest possible hardware!
-
Naturally… The best would be to just be able to connect my USB-C-to-{HDMI,VGA} adapter, that has been sitting idly… 😕 One day, I guess…
Of course, this is a blog post published to brag about my stuff, but also to serve me as persistent memory in case I need to recreate this…

